Keeping Sessions Alive in Umbraco with Third-Party Payment Providers
Integrating with third-party payment providers in Umbraco comes with a few unique challenges, particularly around session persistence. For instance, when users complete a transaction and return to the site, they often find their session data gone. This disrupts the user flow and could easily lead to lost conversions.
After running into this issue recently, I found that I needed a configuration that enables session persistence on redirect—particularly when POSTing—using a combination of settings in my site's startup. Here’s how it’s done.
The Problem with Sessions and Payment Providers
When working with external providers like payment gateways, there’s a bit of a juggling act involved in keeping session data intact. Once users are redirected back to the site, some payment providers can drop session cookies. This means users might lose their place, which, depending on your application, can create serious issues—especially for e-commerce or membership journies
The Fix: Configuring Cookies and Enabling Sessions
The solution revolves around reconfiguring Umbraco's session and authentication cookies so they’re compatible with third-party redirects. Here’s what I used in Program.cs to ensure session continuity:
builder.CreateUmbracoBuilder()    .AddBackOffice()    .AddWebsite()    .AddDeliveryApi()    .AddComposers()    .Build();
builder.Services.ConfigureApplicationCookie(options =>{    options.Cookie.Name = ".AspNetCore.Identity.Application";    options.Cookie.HttpOnly = true;    options.Cookie.SecurePolicy = CookieSecurePolicy.Always;    options.Cookie.SameSite = SameSiteMode.None;});
builder.Services.AddSession(options =>{    options.Cookie.Name = "UMB_SESSION";    options.Cookie.HttpOnly = true;    options.Cookie.SecurePolicy = CookieSecurePolicy.Always;    options.Cookie.SameSite = SameSiteMode.None;});
WebApplication app = builder.Build();
Additionally, in Program.cs, I added a line to configure my changes to sessions across the application. Without calling this, your configuration won’t take effect, and session data won’t be retained on redirect.
...await app.BootUmbracoAsync();
app.UseSession();
await app.RunAsync();...
A few considerations about the configuration I chose:
- Using
ConfigureApplicationCookie, I used the same cookie name as the built in identity provider and specifiedSameSiteMode.None. This is critical because some providers don’t work well withSameSiterestrictions, which are often the default in modern browsers. - With
AddSession, I used Umbraco's session cookie nameUMB_SESSION. SettingSameSiteMode.Noneallows the session to persist when users are redirected back from the provider. - The call to
app.UseSession()enables this updated session usage throughout the application, which ensures session continuity. - Setting
SecurePolicy.Alwaysensures cookies are only sent over HTTPS, adding an essential layer of security for sensitive user data.
Configuring these meant that when I'd hit the 3DSecure confirmation on the payment provider and it tried to return to my Umbraco site, the POST request was accepted and I could access values sent in HttpContext.Request.Form.
Bonus: Testing Locally with Visual Studio’s Dev Tunnels
I did however come across an issue with the payment provider I was using (Opayo/SagePay) where the callback URL couldn't be a localhost URL. I knew about services like ngrok and had used Visual Studio's Dev Tunnels before, which came in really handy. Here's how I got it working with my site:
Set Up a Persistent Dev Tunnel
Setting the Dev Tunnel to be a persistent one in Visual Studio allows you to keep the same URL for each test session, removing the hassle of reconfiguration. This means it can be set up as a callback URL for your payment provider or B2C login system.Enable “Use Tunnel Domain”
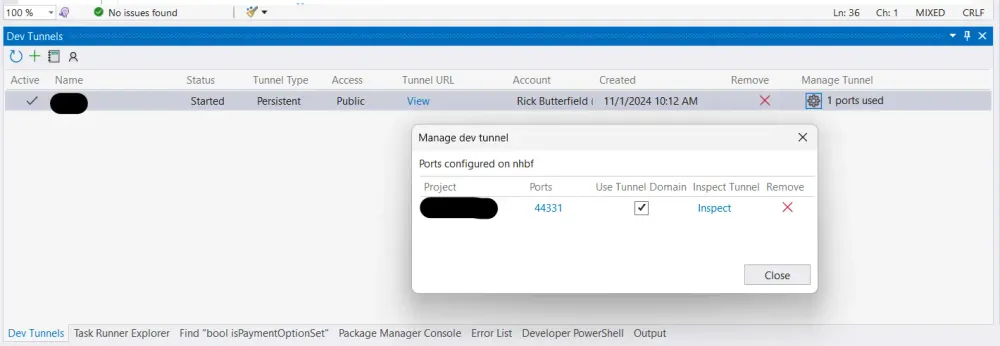
This was the trickiest setting to find, and is buried inside the Dev Tunnels window! This setting modifies the host header, presenting the Dev Tunnel URL as a live domain instead oflocalhost. I had to enable it once the site was running, refresh my browser and then it appeared to persist.

The "Manage dev tunnel" window open with "Use Tunnel Domain" checkbox ticked.
Configure Hosts
Adding"AllowedHosts": "*"inappsettings.jsonenables connections from any host, including Dev Tunnel URLs, which is handy if your tunnel URL does change or multiple people on your team need to test this way.Update
launchSettings.json
InlaunchSettings.json, I updated the IIS Express profile to use the Dev Tunnel URL asapplicationUrl. Specifically, I couldn't get the profile forIIS Expressto work properly, so had to update both profiles as shown below:
"profiles": { "IIS Express": { "commandName": "IISExpress", "launchBrowser": true, "applicationUrl": "https://YOUR-TUNNEL-URL.uks1.devtunnels.ms/", "environmentVariables": { "ASPNETCORE_ENVIRONMENT": "Development" } }, "Umbraco.Web.UI": { "commandName": "Project", "dotnetRunMessages": true, "launchBrowser": true, "applicationUrl": "https://localhost:44331;http://localhost:41293", "applicationUrl": "https://localhost:44331;http://localhost:41293;https://YOUR-TUNNEL-URL.uks1.devtunnels.ms/", "environmentVariables": { "ASPNETCORE_ENVIRONMENT": "Development" } }}With these changes, I could test the entire workflow from start to finish without deploying to a live server. It saved me so much time rather than having to build, deploy, log and then debug from there!